This post may contain affiliate links. Please read our disclosure policy.
There’s something almost poetic about a container of kimchi bubbling away in your kitchen — a living food transforming itself through time, flavor, and fermentation. The scent of garlic, chili, and ginger fills the air, mingling with the sweetness of Napa cabbage and the earthiness of daikon radish. This isn’t just food; it’s heritage in a jar. Authentic Korean kimchi lies at the soul of Korean cuisine, representing both its bold spirit and deep-rooted traditions.

For centuries, kimchi has been an essential part of Korean daily life. Historically, families gathered each autumn for kimjang — the communal preparation of large batches of kimchi to last through the winter. This wasn’t just cooking; it was an act of love and connection, where generations worked side by side, passing down recipes, techniques, and laughter. Today, that same ritual continues in homes across Korea and beyond, bringing people together around food that sustains both body and heart. Continue reading to learn how to make kimchi.
Ready to make this recipe? Shop my Fermentation Essentials List to get all the items you will need to make kimchi.
Table of Contents
The Art of Fermentation
At its core, Korean kimchi begins simply — with crisp Napa cabbage, salt, and time. The cabbage is salted to draw out water, allowing it to soften and prepare for the bold seasoning paste that follows. This paste, often made with Korean chili flakes (gochugaru), garlic, ginger, fish sauce, sugar, and sometimes fermented shrimp, gives kimchi its vibrant flavor and iconic red hue. Every family has its own balance — some prefer it mild and garlicky, others fiery and briny. Once the cabbage is coated and packed into jars, fermentation begins. Sometimes I add salted shrimp sauce also to give more umami flavor to the kimchi.
As the days pass, kimchi transforms. Friendly bacteria develop, enriching it with probiotics and complex tangy notes. The texture changes from crisp to tender, and the flavor deepens into something savory, spicy, and utterly addictive. That’s the beauty of authentic Korean kimchi — it’s alive, evolving each day, never the same twice. Once you understand how to make kimchi, the steps and why you are doing them, you can truly make Kimchi your own. I love experiments with the flavors.
Follow my Easy Kimchi Recipe below to make your first batch.
Brief Breakdown of Lacto-fermentation
Lacto-fermentation is the process in which good bacteria like Lactobacillus convert sugars into lactic acids which preserves the vegetable. Lactobacillus is a natural occurring bacteria that exist on the skin of fruits and vegetables. It grows in anaerobic (oxygen-free) environments. We create this type of environment using a salt brine. The salt brine inhibits the growth of bad bacteria, like botulism and preserves the vegetables. The lactic acid produced during lacto-fermentation is what gives fermented foods their tangy flavor.
Shop my Fermentation Essentials List now to begin your journey of fermentation!!
If you are not as interested in the science behind fermentation and want to get right to my kimchi recipe, just click here.
How Much Salt Should I Use?
To create a safe sodium concentration for things you want to lacto-ferment, you take 2% of the entire weight of said vegetable or fruit. This will tell you the amount of sodium you need to stay within safe fermentation levels. For this kimchi recipe, I don’t measure the sodium as I just salt the leaves and wash it off. However, if you are making other lacto-fermented foods the example below with help you determine how much salt to use in your ferment.
For example, if you have 500g of cucumber, you take 500g x .02 to equal 10g. This mean you should add at least 10g of salt to your brine solution.
Foods that are preserved by lacto-fermentation
Kimchi
Yogurt
Sauerkraut
Kvass
Pickles
Ways to Enjoy Kimchi
One of kimchi’s greatest charms is its versatility. It goes very well with so many dishes.
Fresh kimchi, known as geotjeori, has a bright crunch that pairs perfectly with grilled meats or rice bowls.
Older, more fermented kimchi takes on a sour intensity that shines in dishes like kimchi jjigae (stew), kimchi bokkeumbap (fried rice), Budae Jjigae (Army Base Stew), or even grilled cheese sandwiches with a spicy twist.
It’s the perfect balance of flavor — spicy, tangy, salty, and just a touch sweet — that complements almost anything.
A Taste of Heritage
Making kimchi at home is more than just following a recipe — it’s embracing a centuries-old tradition of care and patience. Each batch tells a story of its maker, the ingredients used, and the time it was made. Whether you’re crafting your first jar or refining a family recipe, the process connects you to a culture that values balance, community, and respect for the seasons. I have thoroughly enjoyed researching Korean culture to learn to make Kimchi. For me, as a person of Black American culture and lineage, I see these types of explorations as a cultural exchange.
So the next time you take a bite of authentic kimchi, remember: you’re tasting history. You’re experiencing a living, breathing food that has nourished people for generations. Tangy, spicy, and full of life — kimchi isn’t just a side dish. It’s the heartbeat of Korean cuisine.
Ingredients and Tips
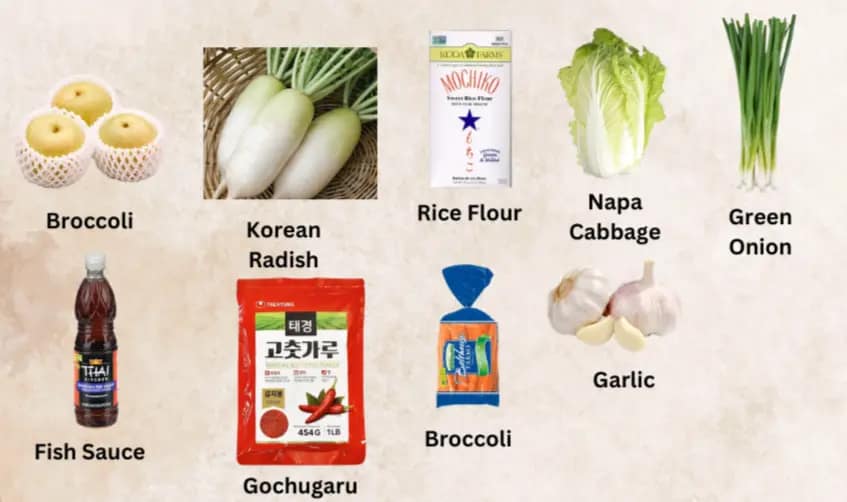
These are most of the ingredients you will need to make apricot carrot bread. You can find the full list of ingredients on the recipe card below.
Korean Radish- Korean radish is know for its taste and crunch in kimchi. Korean radish is pretty girthy, short, and stout with a green top. This radish bigger thicker than Japanese Daikon radish. I also have a harder time locating Korean radish wear I live. I live in Alabama and Daikon radish is much easier to find here so I usually substitute it for the Korean radish in this recipe.
Garlic- Garlic is a must in this recipe. It is strong flavor that I would not replace if you want to the kimchi to taste properly. Raw garlic is part of the reason kimchi is so healthy. Raw garlic when chopped or crushed forms a substance called allicin. Allicin has been shown to have antifungal, antioxidants, and cancer-fighting properties. I personally love garlic and eat it raw all the time.
Asian Pear- Asian pears are round like apples and not very hard to come by. It is mildly sweet. This ingredient is easily substituted with anjou or bosc pears.
Sweet Rice Flour- I use mochiko sweet glutenous rice flour. This ingredient is important to the paste that holds the kimchi together. It also helps to feed the lactobacillus bacteria we want to grow to ferment the kimchi. I have seen some people use all-purpose flour as substitute but you do have to make sure you cook the flour taste off if you choose to use all-purpose flour. I prefer the mochiko rice flour because it does not have a weird floury taste.
Korean Red Pepper Flakes (Gochugaru)- This is truly what makes kimchi, kimchi. Gochugaru cannot be replaced as it gives the proper taste and color to the kimchi. American hot pepper flakes simply will not work here. Gochugaru is spicy but it also has a bit of sweetness, floral quality, and smokiness that America style red pepper flakes simply do not have. It has a lot more complex flavor notes.
Other ingredient options-
- Fermented shrimp- Many Koreans use fermented shrimp or fish in their kimchi. This is not an ingredient I used but it does add depth to the umami flavor and adds protein to the kimchi.
Latest Videos
Before You Start!! If you make this, please leave a review and rating letting us know how you liked the recipe. This helps our business to do well and continue providing free recipes.

Authentic Korean Kimchi
Video
Equipment
- Food safe gloves
- food processor
Ingredients
- 2 large Napa Cabbage
- 5-7 green onions
- 1 large white onion
- 3 tbsp fresh ginger peeled
- 3 medium carrots peeled
- 1 medium Korean or daikon radish
- 1 large bulb of garlic
- 1 Asian or Anjou pear
- 2 cups water
- 4 tbsp mochiko sweet rice flour
- ½ cup fish sauce
- 1 ½ cup Gochugaru/Korean Hot Pepper flakes
- Kosher or other non-iodized salt
Instructions
Prepare Cabbage and Veggies
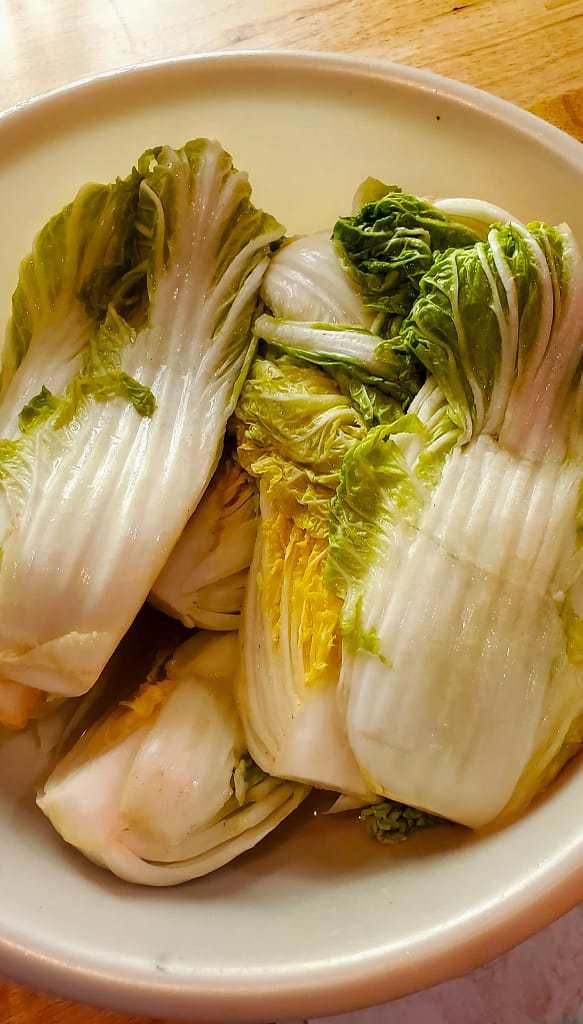
- Cut napa at the butt ends and pull the rest of the way apart. Continue until you have 8 equal pieces. The inside leaves should be yellow with no browning. (Note: If you see browning cabbage is old and should not be used for fermenting)
- Cut the brown end off the cabbage pieces making sure to not cut so deep that the leaves disconnect from each other.
- Wash the cabbage pieces thoroughly in cold water. Pour off water. Take a piece of cabbage. Sprinkle salt between each of the leaves, working from outside to the inner most leaves. Make sure to get the salt down to the stem of the cabbage. Repeat for each cabbage piece.
- Allow cabbage to salt for 1-2 hours. Turn cabbage every 30mins. Cabbage is ready when stem is very soft and cabbage can be rolled without breaking. Once done, rinse between leaves thoroughly to remove excess salt.
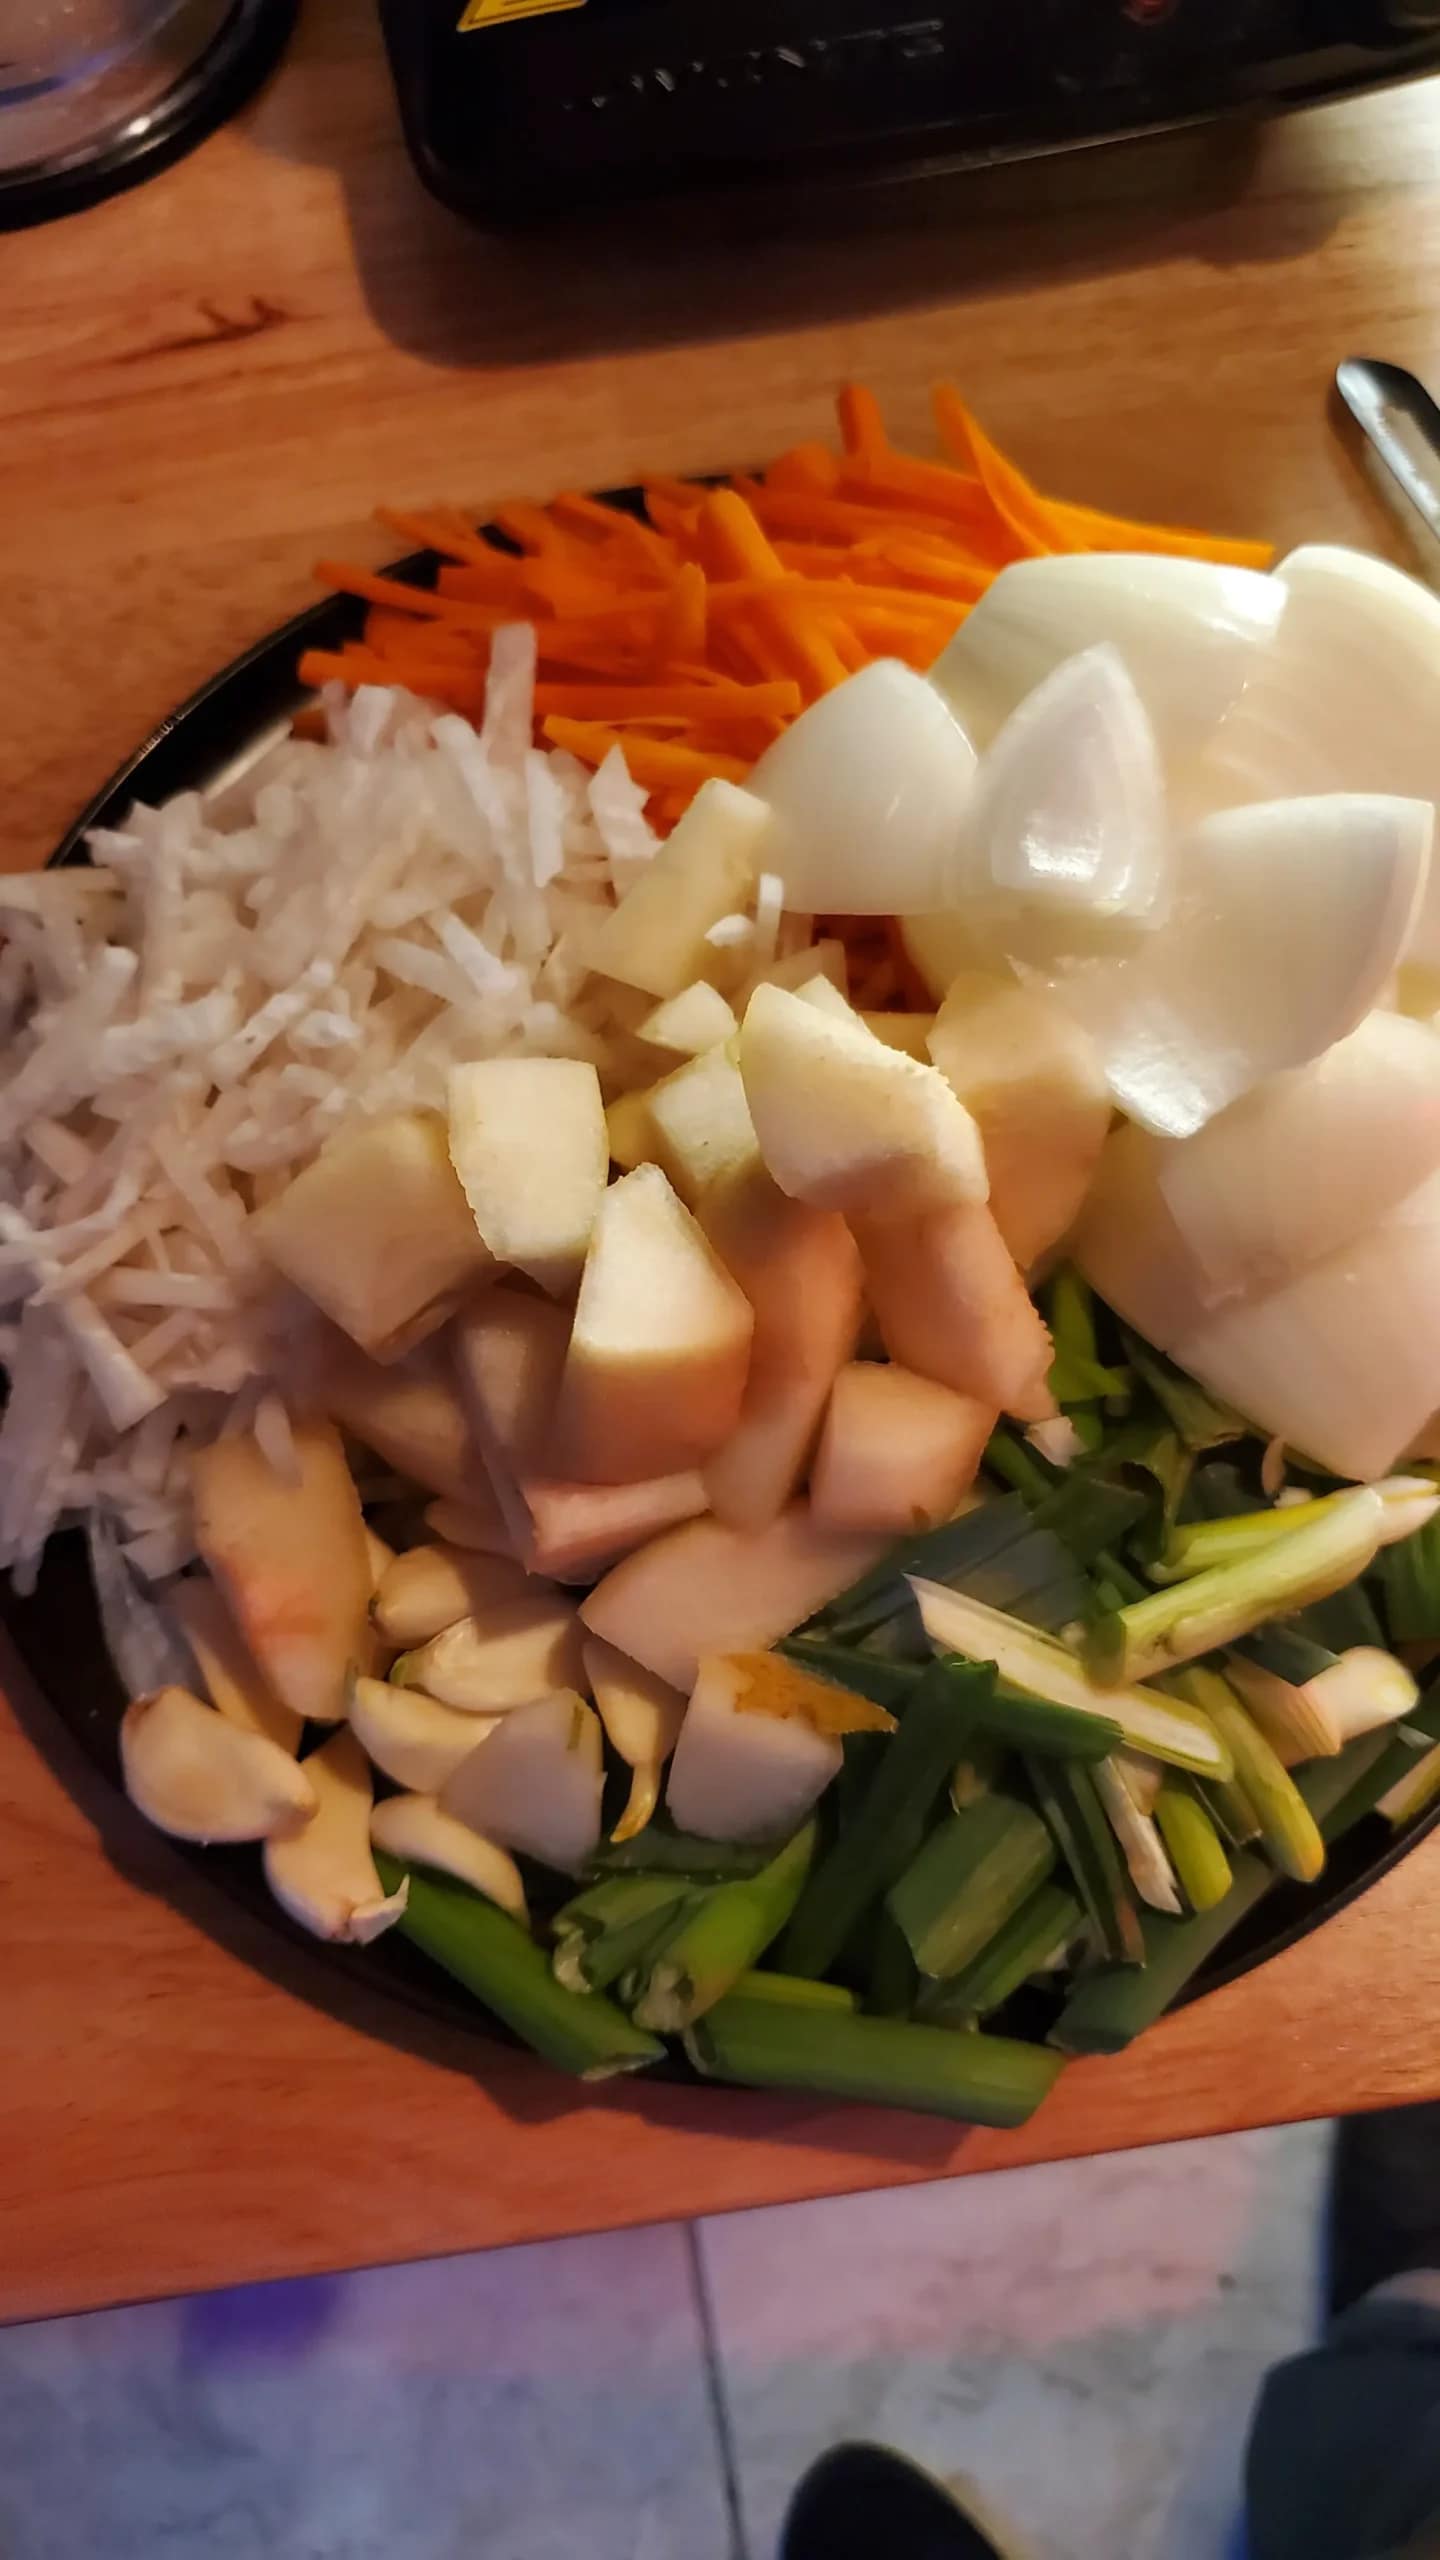
- Cut the greens onion diagonally into bite-sized pieces. For carrots, cut into 3rds, then julienne into match sticks. For the radish, slice it thinly, then julienne into match sticks.
Porridge/Kimchi Paste
- To a medium sauce pan, pour in the water. Add in the sweet rice flour. Whisk until well combined. Whisk over medium heat until paste has thickens slightly. Paste is ready when it coats the back of a spoon. Put aside to cool.
Puree
- Peel the garlic. Dice white onion roughly. Peel, core, and dice pear roughly.
- To a food processor, add the garlic, ginger, pear, and white onion. Blend into an even puree.
Making the Kimchi
- To a large bowl, pour in the paste, puree, fish sauce, and gochugaru. Stir ingredients until combined.
- Add in green onions, carrots, and radish. Stir until combined.
- Put on gloves to avoid skin irritation. Place your containers in arms reach.
- Take a piece of cabbage, starting from the outer-most leaf, rub the veggie-pepper mixture onto each of the leaves. Once coated, roll the cabbage piece up and place into your sterile container. Press down to push out air. Repeat with the rest of the cabbage.
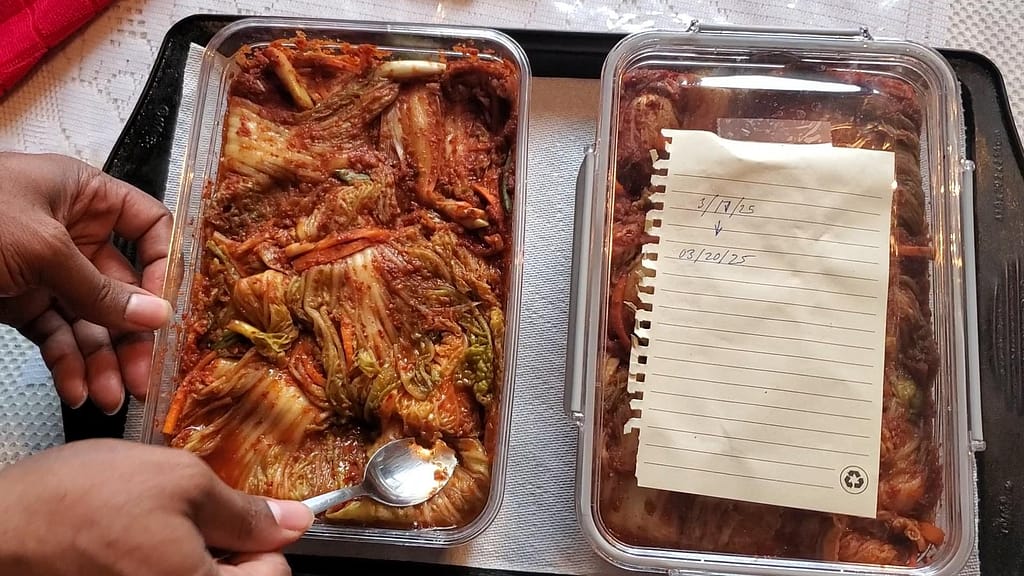
- Once containers are full, add on lids. Take a sticky and note the date the kimchi was made and the date 3 days forward. Place the kimchi containers onto a cookie sheet lined with paper towel. Place the kimchi on your counter to ferment at room temperature. Cover it with a dark towel to prevent exposure to light if your containers are clear.
- On day 3, open the container. You should not see any mold or discoloration. Kimchi should look like how you put it in aside from having a fermenting smell (It should not look or smell bad). Use a spoon to press down. If you see bubbles, this is a good sign that kimchi is fermenting and is ready to eat. From now on, keep the kimchi refrigerated.
- Enjoy!! 😊
Notes
Nutrition
More Delicious Recipes
This post may contain affiliate links. Please read our disclosure policy. There’s something deeply comforting about making sourdough bread from scratch. It’s not just bread—it’s a process, a routine, and for many home bakers, like myself, a little daily ritual. From feeding your starter to pulling a golden, crackly loaf from the oven, sourdough baking feels…

This post may contain affiliate links. Please read our disclosure policy. Fluffy Garlic Butter Naan is more than just a side dish—it’s an experience. The moment it hits the table, still warm and glistening with butter, you cannot help but crave it. The smell alone is enough to make everyone reach for a piece. It’s simple,…

This post may contain affiliate links. Please read our disclosure policy. There are desserts you enjoy, and then there are desserts you remember. Chocolate Butterscotch Cheesecake firmly belongs in the second category. It is rich, velvety, and unapologetically indulgent. This cheesecake is designed for true chocolate lovers—the kind who believe chocolate should be deep, intense, and…

This post may contain affiliate links. Please read our disclosure policy. Creating a functional sourdough starter from scratch is a great accomplishment for any baker. However, the process usually leaves a lot of discard that one has to either make use of or throw away. With today’s economy and issues, the thought of wasting flour in…

This post may contain affiliate links. Please read our disclosure policy. Icebox cookies are a classic, old-fashioned cookie that get its name from chilling the cookie dough in the refrigerator (or “icebox”) before baking. Once chilled, the dough is sliced into rounds or shapes and baked until lightly golden. The result is a tender, crisp-edged cookie…
This post may contain affiliate links. Please read our disclosure policy. This is one of the easiest and flakiest pie crust recipes you will find anywhere. A flaky pie crust is truly less about ingredients and more about technique. A truly flaky pie crust is a great achievement for any baker, and is important if you…